It happens in an instant. One second your phone is in your hand, the next it’s slipping out of your pocket into the toilet, sliding off the pool deck, or getting caught in a sudden downpour. Your heart drops right along with it.
The good news? A brief encounter with water doesn’t have to mean the end of your phone. What happens in the first five minutes after the splash matters more than almost anything else you’ll do afterward and most people get it wrong by panicking, powering the phone on to “check,” or reaching for a bag of rice that won’t actually help.
This guide walks through exactly what to do, step by step, from the moment your phone hits the water to the point where it’s safe to turn back on plus what to avoid, how to handle trickier situations like saltwater or sugary spills, and when it’s time to call in a professional.
Understanding the Real Danger
Here’s something most people get wrong: water itself usually isn’t what destroys a phone. The real danger is what happens when water mixes with electricity that’s still flowing through the device. When your phone stays powered on while wet, water creates unintended paths for electrical current, and that’s what leads to short circuits, fried components, and corrosion on the internal circuit board. This is exactly why powering off immediately is more important than drying it.
It also matters what kind of “water” you’re dealing with. Plain rainwater or tap water is relatively low-risk compared to saltwater, pool water, or sugary drinks like soda and coffee. Saltwater and chlorinated water accelerate corrosion far faster than fresh water, while sugary liquids leave behind a sticky residue that can gum up ports and speakers even after everything dries out.
Many modern phones carry an IP rating (like IP67 or IP68), which tells you how water-resistant they are under specific lab conditions, typically fresh, still water at a certain depth and duration. But these ratings don’t account for hot water, saltwater, pressurized water (like a strong shower jet), or repeated exposure over time. Water resistance also degrades as a phone ages, especially if it’s been dropped or the seals have worn down. In other words, even a phone with a high IP rating isn’t immune; it just buys you a bit more of a safety margin, not a guarantee.
Immediate Response
The moment your phone hits water, your actions matter more than anything you’ll do afterward. Speed and the right instincts here can be the difference between a full recovery and permanent damage.
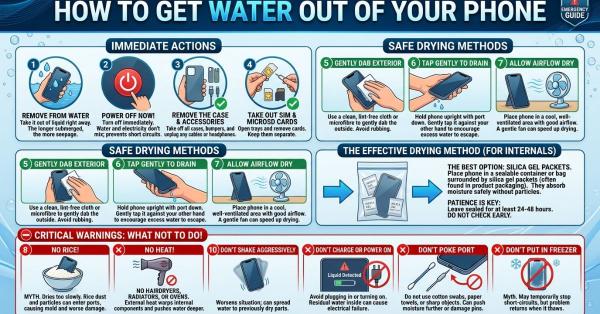
Get it out of the water immediately. Don’t hesitate every extra second submerged increases the chances of water working its way into sensitive components.
Power it off right away. If the screen is still on, shut the phone down as fast as possible. This is the single most important step, since it’s the combination of water and live electrical current that causes real internal damage, not the water on its own.
Resist the urge to check it. It’s natural to want to immediately unlock your phone to see if it still works, check for notifications, or test the screen. Don’t. Pressing buttons, tapping the display, or waking the phone up only invites more risk while water may still be sitting on internal contacts.
If it’s already off, leave it off. Don’t turn it on “just to check.” A phone that’s already powered down when it hits water is in a much better position powering it on prematurely is what turns a minor incident into a major one.
Avoid unnecessary movement for now. While you’ll need to dry it shortly, don’t start shaking, blowing on it, or pressing buttons repeatedly in the first minute. Simply remove it from danger, power it down, and move calmly into the drying process.
Disassembly & External Drying
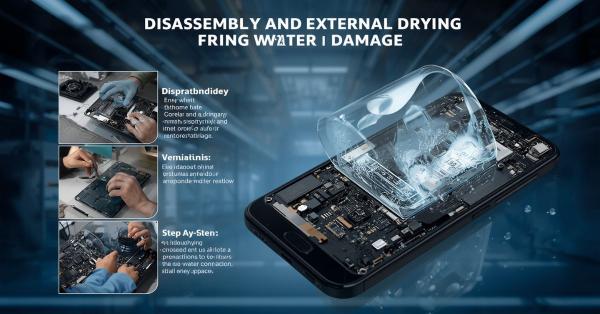
Once your phone is powered off and out of harm’s way, the next step is stripping away anything that could be trapping moisture against the device.
Remove the case first. Cases, especially thick or rugged ones, can trap water against the phone’s body, slowing down drying and keeping moisture in contact with seams and ports longer than necessary.
Take off the screen protector if needed. If water has visibly pooled underneath a screen protector or it’s peeling at the edges, remove it so trapped moisture doesn’t sit against the display.
Eject the SIM tray. This is a small but important step. The SIM slot is a direct opening into the phone’s interior, and ejecting the tray lets any water inside that channel drain out and air circulate through it.
Detach accessories. Pop sockets, MagSafe attachments, or any add-ons stuck to the back of the phone should come off, since they can hold moisture against the surface.
Pat the phone dry with a microfiber cloth. Gently press don’t rub a soft, absorbent cloth over the entire phone, paying close attention to seams, button edges, the camera bump, and speaker grilles. Rubbing can push water further into openings rather than removing it.
Drain the ports. Hold the phone with charging port and speaker openings facing downward, then gently tap it against your palm a few times. This encourages trapped water to drip out rather than settle deeper inside.
Drying Methods Compared
Not all drying methods are created equal, and choosing the right one can significantly speed up recovery.
Air drying is the simplest and safest baseline method. Place your phone in a dry, well-ventilated spot near an open window or a fan blowing indirectly and let natural airflow do the work. It’s slow but reliable and carries zero risk of damage.
Silica gel packets are far more effective than most home remedies. These are the small packets found in shoeboxes, vitamin bottles, or electronics packaging. Burying your phone in a container full of silica gel packets overnight draws moisture out more efficiently than passive air drying alone.
Rice, despite being the most commonly recommended fix, is largely a myth. Rice grains are too large to create tight, even contact with the phone, and they don’t actually absorb moisture as effectively as people assume. Worse, rice dust and small fragments can get lodged in ports and speaker openings, creating a new problem.
Desiccant dry boxes or dedicated drying pouches, sold specifically for electronics, are purpose-built for this exact situation. They typically use stronger moisture-absorbing materials than household silica packets and are worth having on hand if you live somewhere humid or frequently work near water.
Vacuum-sealed bags with desiccant combine two effective principles removing surrounding air while surrounding the phone with a strong moisture absorber making this one of the more effective DIY methods when done carefully.
What to Avoid Expanded
Just as important as knowing what to do is knowing what not to do, since many common instincts actually make water damage worse.
Don’t use heat sources. Hairdryers, ovens, radiators, or leaving your phone in direct sunlight might seem like a fast fix, but heat can warp internal plastic components, damage the battery, or even push moisture deeper into the device before it has a chance to evaporate safely.
Don’t use compressed air. Blasting air into ports might feel like it’s clearing water out, but the high pressure can actually force water further into the phone’s internal components rather than pushing it out.
Don’t charge the phone. Plugging in a wet or even slightly damp phone is one of the riskiest things you can do. Charging introduces higher electrical current into a device that may still have moisture on its internal contacts, dramatically increasing the risk of a short circuit.
Don’t shake it too vigorously. A few gentle taps to help water drain is fine, but aggressive shaking can send water into areas of the phone that were previously dry, spreading the problem rather than solving it.
Don’t freeze the phone. This is a lesser-known myth, but freezing does nothing to remove moisture and can introduce condensation as the phone thaws, adding more water rather than less.
Don’t repeatedly press buttons or the screen to “test” whether it’s working; this only invites more risk during the critical drying window.
The Waiting Period
Once you’ve dried the exterior and removed trapped water where you can, the hardest part begins: waiting. This is where most people go wrong, either turning the phone on too soon out of impatience or assuming that because it looks dry, it is dry.
Why 24–48 hours matters. Even though the outside of your phone may feel completely dry within an hour, moisture can still be trapped in tighter spaces around the charging port, near the speaker mesh, or inside seams between the screen and body. These areas take much longer to fully evaporate than the visible surface.
Deeper exposure needs more time. If your phone was fully submerged for more than a few seconds, or exposed to water under pressure (like a strong shower jet or being dropped into a moving body of water), it’s worth extending the wait to 72 hours to be safe.
What’s happening internally. During this waiting period, any remaining moisture is slowly evaporating away from sensitive components like the logic board, battery connector, and charging port contacts. Rushing this process by powering the phone on early can reintroduce the exact risk you were trying to avoid electrical current flowing through areas that are still damp.
Signs of impatience to watch for. Constantly picking up the phone to “check” if it’s dry, pressing the power button to peek at the screen, or plugging it in “just for a second” are all small actions that can undo the progress you’ve made. Let the clock run its course.
Special Cases
Not all liquid exposure is the same, and certain situations call for extra steps beyond the standard drying process.
Saltwater exposure. If your phone fell into the ocean or came into contact with saltwater, don’t go straight to drying. Salt residue left behind as water evaporates can cause corrosion on internal contacts. Rinse the phone briefly in fresh, still water (never running water, which can push liquid deeper in) to dilute the salt before beginning the drying process.
Sugary or sticky liquids. Coffee, soda, juice, or any sweetened drink leaves behind sticky residue that plain drying won’t fully resolve. Once the phone is safely dried, gently wipe accessible surfaces and ports with a cloth lightly dampened with distilled water to help lift residue that could otherwise attract dust or gum up moving parts like buttons.
Toilet water. Beyond the drying steps, toilet water exposure calls for a hygiene pass to wipe down the exterior of the phone with a disinfectant wipe (avoiding ports and openings) once it’s fully dry and back in use.
Charging port corrosion. If you notice green or white residue building up around the charging port after drying, this is a sign of oxidation. Avoid inserting a charging cable until it’s been gently cleaned, ideally with an isopropyl alcohol swab and a soft brush.
Persistent muffled sound. If your speaker or microphone still sounds muffled after the full drying period, it may simply be residual moisture in the mesh rather than permanent damage. Give it another day before assuming the worst.
Turning It Back On Diagnostic Checklist
After the waiting period is over, resist the urge to just power on and use your phone normally. A quick, methodical check-through helps you catch problems early before they turn into permanent damage.
Do a visual inspection first. Check the SIM tray slot for a liquid contact indicator, a small sticker that changes color (often to red or pink) when exposed to moisture. Also look under the camera lens for any fogging or condensation, which can indicate water is still trapped inside.
Power on and check the screen. Turn the phone on and watch for any flickering, discoloration, or unresponsive areas on the display before doing anything else.
Test touch response. Swipe around the home screen and open a few apps to confirm the touchscreen is registering taps accurately across the entire surface.
Check the speaker and microphone. Play a short audio clip or video to listen for distortion, crackling, or muffled sound, then make a quick voice memo or call to test the microphone.
Test the camera. Open the camera app and check for fogging, blurriness, or dark spots in the lens that weren’t there before.
Test charging last. Only after everything else checks out should you plug in a charging cable, watching closely for any unusual heat, sparking, or error messages during the first few minutes.
If anything seems off at any step, stop and give the phone more time to dry rather than pushing forward.
When to Seek Professional Help
Sometimes, despite doing everything right, a phone still shows signs of trouble. Knowing when to stop troubleshooting on your own and hand it to an expert can save you from causing further damage.
Signs of internal corrosion or persistent malfunction. If your phone won’t power on at all after the full drying period, or if it powers on but shows erratic behavior random touches registering on the screen, the device restarting on its own, or apps crashing repeatedly these are signs that point to internal damage that a few more hours of air drying won’t fix.
Manufacturer service vs. third-party repair. For newer phones still under warranty (even if liquid damage isn’t covered), starting with the manufacturer’s official service center is often the safer route, since they use parts and diagnostic tools designed specifically for your device. Third-party repair shops can be faster and cheaper, and are often a good option once a phone is out of warranty.
Professional water damage treatment. Repair professionals often use ultrasonic cleaning, a process that uses high-frequency sound waves in a cleaning solution to remove corrosion and residue from the internal circuit board, something that’s impossible to replicate safely at home.
Warranty implications. Most manufacturers install liquid contact indicators specifically to detect water exposure, and a triggered indicator typically voids standard warranty coverage. It’s worth checking your specific warranty terms, since some plans (like extended protection plans) do cover accidental liquid damage separately.
Prevention for the Future
Once your phone has recovered or even if this is prompting you to think ahead a few simple habits can spare you the stress of dealing with water damage again.
Invest in a waterproof case or pouch. If you’re frequently near water at the beach, poolside, boating, or even just cooking in a kitchen with a sink nearby, a dedicated waterproof case adds a real layer of protection beyond your phone’s built-in resistance. For higher-risk activities, a waterproof pouch that fully seals the device is worth the extra step.
Be mindful of where you place your phone. Many water-related accidents happen from routine habits: setting your phone on the edge of a bathroom sink, propping it near a pool ledge, or keeping it in a pocket while doing dishes. Building small awareness around these moments like setting your phone somewhere fully dry and stable prevents most accidents before they happen.
Keep your phone’s seals in good condition. If your phone has water resistance built in, avoid removing or damaging the seals around ports and buttons through rough handling or unofficial repairs, since this resistance can wear down over time even without visible damage.
Back up your data regularly. Even with all the right precautions, accidents happen. Keeping regular backups whether through cloud storage or a periodic manual backup means that even if a phone doesn’t survive a water incident, your photos, contacts, and files will.
Conclusion
Water damage feels like an emergency at the moment, but how you respond in the first few minutes and how much patience you show in the days after determines whether your phone bounces back or not. The core principles are simple: get it out of the water fast, power it off immediately, resist the temptation to check or charge it too soon, and give it the full drying time it needs before turning it back on.
Read More: 👉👉 PlayMyWorld Gaming: Meaning, Background, Uses, and What It Really Refers To
To recap the essentials:
- Remove it from water immediately and power it off. Don’t test it first.
- Strip away the case, SIM tray, and any accessories that could trap moisture.
- Pat it dry gently and drain the ports with light tapping, port-side down.
- Choose an effective drying method: silica gel or a dedicated drying pouch beats rice every time.
- Wait at least 24–48 hours before powering on, longer for deeper exposure.
- Run through the diagnostic checklist carefully before resuming normal use.
- Know when to call a professional if something still seems off.
Most phones can survive a splash, a spill, or even a brief dunk if you handle those first critical minutes correctly and avoid the common myths, especially the rice trick that can actually make things worse. The next time water and your phone cross paths, you’ll know exactly what to do.